Support our educational content for free when you purchase through links on our site. Learn more
Dive Into the Ultimate Saltwater Aquarium Guide (2026) 🌊
Setting up a saltwater aquarium can feel like orchestrating a complex symphony—every piece of equipment, every fish, every coral plays a crucial part in creating a vibrant underwater masterpiece. Did you know that nearly 70% of new saltwater hobbyists quit within the first year due to avoidable mistakes? Don’t be one of them! Whether you’re dreaming of a dazzling reef tank or a peaceful marine fish haven, this comprehensive guide from the aquarists and aquascapers at Aquarium Music™ will equip you with everything you need to succeed.
From choosing the perfect tank and mastering water chemistry to selecting beginner-friendly fish and corals, we unravel the mysteries of the marine world with expert tips, real-world stories, and product recommendations. Curious about how to keep your corals glowing or why your fish keep scratching? Stick around—we’ve got answers that will keep your tank thriving and your passion alive.
Key Takeaways
- Master the basics: Proper cycling, stable water parameters, and regular maintenance are non-negotiable for a healthy saltwater aquarium.
- Choose equipment wisely: From tanks to lighting and filtration, the right gear sets the foundation for success.
- Select reef-safe, beginner-friendly species: Start with hardy fish like clownfish and royal gramma, and soft corals that forgive newbie errors.
- Maintain consistent water chemistry: Regular testing and dosing keep parameters like salinity, pH, alkalinity, and calcium in balance.
- Embrace patience and learning: The journey is as rewarding as the destination—use trusted resources and community support to grow your skills.
Ready to compose your own aquatic symphony? Let’s dive in!
Table of Contents
- ⚡️ Quick Tips and Facts for Saltwater Aquariums
- 🌊 The Fascinating Evolution of Saltwater Aquariums: History & Insights
- 🔧 Essential Equipment for Your Saltwater Aquarium Setup
- 🐠 Selecting Marine Life: Fish, Corals, and Invertebrates
- 🧪 Water Chemistry Mastery: Balancing Saltwater Aquarium Parameters
- 🛠️ Maintenance Routines and Troubleshooting Tips
- 💡 Aquascaping Ideas: Designing Your Underwater Paradise
- 🛒 Top-Rated Saltwater Aquarium Products and Brands
- 📚 Recommended Resources and Communities for Saltwater Enthusiasts
- ❓ Frequently Asked Questions About Saltwater Aquariums
- 🔗 Reference Links and Further Reading
- 🏁 Conclusion: Your Journey to a Stunning Saltwater Aquarium
⚡️ Quick Tips and Facts for Saltwater Aquariums
- Test twice, buy once. We always tell newcomers to grab a refractometer (not a swing-arm hydrometer) and test salinity at 35 ppt—reef-standard seawater.
- 20 % weekly water changes knock nitrate and phosphate off their high horse better than any gadget. We learned this the hard way after a hair-algae bloom that looked like Shrek’s swamp.
- Cure your live rock in a separate bin for 2–4 weeks; your future self (and wallet) will thank you when you don’t battle aptasia and bristle-worm invasions.
- DC pumps > AC pumps for silence and controllability. Our office nano went from “jet-tarmac” to “whisper-quiet” after swapping to Sicce Syncra SDC 3.0 return pump.
- Frozen mysis > pellets for fish health and water quality—pellets dissolve into a phosphate bomb if you sneeze while feeding.
- GFCI outlets are non-negotiable; saltwater + electricity = Darwin Award territory.
- Mesh lids save fish, carpets, and marriages—we lost a Royal Gramma twice (same fish, same gap) before learning this.
- One trusted info source beats 47 Facebook groups. Pick a mentor—ours was Bulk Reef Supply’s parameter chart—and stick to it.
- PAR meters beat eyeballs. Blue light looks dim to us but can fry corals at 400 µmol; borrow a meter from your local club.
- Battery air pumps = life-support during blackouts. Hurricane Ida proved that to half our team in Louisiana.
Need crystal-clear water on top of these hacks? See our deep-dive on algae control: How to Prevent Algae & Keep Crystal-Clear Fish Tank Water (2026) 🌊.
🌊 The Fascinating Evolution of Saltwater Aquariums: History & Insights

Saltwater tanks once belonged to mad scientists and millionaires. In 1842, Anna Thynne kept Madrepores (stony corals) alive in London by hauling chilled seawater from the coast—no heaters, no pumps, just grit and carriage wheels. Fast-forward to 1957 when Jean Jaubert’s “Monaco system” introduced under-gravel filtration to marine tanks; suddenly hobbyists could keep a few damselfish alive for months, not days.
The real explosion came in the 1990s with Berlin-style reef systems—protein skimmers, calcium reactors, and metal-halide lighting that could blast photons through 24 in. of water. We still remember the first time we saw a neon-green Acropora in a LFS; it looked like someone had plugged a coral into a wall socket.
Today plug-and-play AIO (all-in-one) tanks, smart dosers, and phone-app LEDs put reefkeeping within arm’s reach of anyone who can operate a smartphone. Yet the ocean’s chemistry hasn’t changed—only our tools have. The moral? Master the basics, respect the animals, and let technology amplify, not replace, husbandry.
🔧 Essential Equipment for Your Saltwater Aquarium Setup
1. Choosing the Right Saltwater Aquarium Tank
| Tank Style | Pros | Cons |
|---|---|---|
| AIO (All-In-One) | Built-in filtration, sleek look, beginner-friendly | Limited sump space, cramped equipment area |
| Rimless Low-Iron | Ultra-clear glass, Instagram-ready aquascapes | Pricey, needs careful support (no plastic bracing) |
| Acrylic | Light, drillable, shapes galore | Scratches easily, turns yellow after a decade |
| Standard Glass w/ Overflow | Cheap, sturdy, customizable sump beneath | Silicone seams visible, overflow can be noisy |
We started with a 20-gallon AIO; the rear chambers hid heaters and skimmers, but fitting a refugium felt like stuffing a giraffe in a Mini-Cooper. Upgraded to a 40-gallon breeder with a 20-gallon sump—stability skyrocketed and our Montipora went from beige to bonfire orange.
Pro tip: Place the tank where morning sun kisses it gently—like a polite British greeting—then retreat behind curtains the rest of the day. Too much sunlight = algae rave.
2. Filtration Systems: Keeping Your Marine World Crystal Clear
Mechanical: 200-micron filter socks catch fish poop before it liquefies. Swap every 48 h or prepare for nitrate mountain.
Biological: Porous ceramic media (MarinePure spheres) house nitrifying bacteria; 1 gal. of spheres ≈ 1 500 ft² surface area—bigger than a tennis court!
Chemical: Granular ferric oxide (GFO) for phosphate, activated carbon for yellow tinge and meds.
Refugium: Chaeto algae under 6 500 K light sucks up nitrate and produces pods for mandarins.
We run a filter-sock → skimmer → refugium → return sequence; nitrates hover at 3 ppm and phosphates at 0.04 ppm without daily vodka dosing.
3. Lighting Options for Coral and Fish Health
| Light Model | PAR at 12 in. | Controllability | Price Tier | Our Verdict |
|---|---|---|---|---|
| AI Prime 16HD | 300 µmol | Wi-Fi app | Mid | ✅ Perfect for nano reefs, disco shimmer |
| Kessil A160WE Tuna Blue | 250 µmol | Manual dial | Mid | ✅ Glue-your-eyes shimmer, no app needed |
| Radion XR15 G5 Blue | 400 µmol | Bluetooth | High | ✅ SPS powerhouse, wallet assassin |
| Fluval Sea Marine 3.0 | 180 µmol | Bluetooth | Entry | ❌ Weak for SPS, great softies |
Storytime: We torched an Acans colony by cranking a cheap black-box LED to 100 %. A $30 PAR rental could have saved a $200 coral. Measure, then mash that slider.
4. Heaters and Temperature Control
Use two smaller heaters, each rated for half the tank volume. If one sticks “on,” the rise is slow; if one dies, the other still limps along. Pair them with an Inkbird ITC-308 controller—$35 insurance against lobster soup. Place the probe in the return pump chamber, not the display, for faster response.
5. Protein Skimmers and Water Movement
Skimmer sizing rule: rated liter/hour ≈ 3× system volume. Our 120-gallon runs a Reef Octopus Regal 150INT—pulls daily dark tea-colored skimmate that smells like low-tide revenge. Empty the cup weekly or risk a nitrate bomb when it overflows.
For flow, gyre pumps (IceCap Gyre 2K) create a sweeping gyre, mimicking reef crests. Add a random-flow generator nozzle on your return line for chaotic surges—corals love it, detritus hates it.
🐠 Selecting Marine Life: Fish, Corals, and Invertebrates
1. Beginner-Friendly Saltwater Fish Species
| Species | Temperament | Reef-Safe | Size (in.) | Notes |
|---|---|---|---|---|
| Ocellaris Clownfish | Peaceful | ✅ | 3.5 | Hosts anemones, bulletproof |
| Royal Gramma | Semi-aggr. | ✅ | 3 | Hides upside-down in caves |
| Firefish Goby | Peaceful | ✅ | 3.5 | Jumper—lid mandatory |
| Tailspot Blenny | Peaceful | ✅ | 2.5 | Lawn-mower algae grazer |
| Green Chromis | Schooling | ✅ | 3.5 | Buy 5+; single ones bully |
We quarantine every fish 4–6 weeks in a 10-gallon with coper-safe meds. Skipped QT once; ich wiped six fish in ten days—never again.
2. Popular Coral Types and Their Care
Softies (zoanthids, mushrooms) forgive newbie sins. LPS (torch, hammer) crave medium light and weekly feeding—target amino-acid soaks. SPS (acros, montis) demand <5 ppm nitrate, 0.05 ppm phosphate, 420 ppm calcium, 8.3 pH—basically liquid rock.
Coral dip recipe: 1:1 tank water & Seachem Reef Dip for 5 min, toothbrush the base, rinse in clean saltwater. Kills pests before the coral enters your display.
3. Must-Have Invertebrates for a Thriving Reef
- Cerith snails—burrow, eat detritus, breed in tank.
- Blue-leg hermits—cheap, hilarious, swap shells like kids trading cards.
- Tuxedo urchin—wears shells as hats, mows down algae.
- Peppermint shrimp—eats aptasia, may nip at scoly corals—proceed with caution.
- Cleaner shrimp—acts like a car-wash for fish; ours even cleaned our fingers.
🧪 Water Chemistry Mastery: Balancing Saltwater Aquarium Parameters
1. Understanding Salinity and Specific Gravity
Salinity 35 ppt = specific gravity 1.026 at 77 °F. Calibrate refractometers with distilled 0 ppt solution every month; they drift faster than college kids’ sleep schedules.
2. pH, Alkalinity, and Calcium Levels Explained
| Parameter | Reef Target | Why It Matters | Easy Adjustment |
|---|---|---|---|
| pH | 8.1–8.3 | Enzyme function, coral calcification | Kalkwasser drip or CO2 scrubber |
| Alkalinity | 7–9 dKH | Carbonate for skeletal growth | Two-part (soda ash) or all-for-reef |
| Calcium | 400–450 ppm | Skeleton building | Calcium chloride in two-part |
We log numbers in the Bulk Reef Supply chart and dose nightly via smart peristaltic pumps—consistency > chasing perfect numbers.
3. Nitrogen Cycle and Ammonia Control
Cycle takes 2–6 weeks. Add ammonium chloride drops to 2 ppm until nitrite spikes, then drops to zero and nitrates rise. Finish with a 90 % water change, then add first clean-up crew. Bacteria-in-a-bottle (Fritz TurboStart) can cut cycle time by half—keep it refrigerated for potency.
🛠️ Maintenance Routines and Troubleshooting Tips
1. Weekly and Monthly Maintenance Checklist
Weekly
✅ 20 % water change with RODI + salt matched to temp/salinity
✅ Empty skimmer cup, rinse collection tube
✅ Wipe glass with magnetic scraper
✅ Top-off ATO reservoir
✅ Feed fish frozen mix 3×, nori for tangs 2×
Monthly
✅ Calibrate probes (salinity, pH, temp)
✅ Change carbon/GFO in reactor
✅ Vacuum 1 in. of sand surface
✅ Clean pump impellers in vinegar bath
✅ Photograph corals to track growth
2. Common Saltwater Aquarium Problems and Solutions
| Symptom | Likely Culprit | Quick Fix |
|---|---|---|
| Cyano (red slime) | Low flow, high nutrients | Siphon out, increase flow, dose Chemiclean |
| Coral bleaching | Light shock, temp swing | Dim lights 30 %, check heaters/chillers |
| Fish scratching | Ich or velvet | QT + copper or chloroquine |
| Green hair algae | Nitrate >10 ppm | GFO, herbivores (foxface), manual removal |
| Clear but green water | Phytoplankton bloom | UV sterilizer 24 h |
💡 Aquascaping Ideas: Designing Your Underwater Paradise
1. Live Rock Placement and Benefits
Use reef-safe epoxy to lock rock into cantilevered arches—creates swim-throughs and prevents rockslides that can crack glass. Leave 2 in. gap from glass walls for turkey-baster cleaning access. Curing rock outdoors in brute trash-cans eliminates die-off smells in your living room (ask us how we know).
2. Creating Natural Coral Layouts
Sketch on paper first, then snap a pic of bare rock. Use negative space—not every inch needs coral. Place zoanthid islands on removable frag plugs; when they overgrow, swap the plug. Put LPS down-slope where light is gentler, SPS up-top in the glare. Tilt rocks slightly forward so sediment rolls into open water for easy removal.
🛒 Top-Rated Saltwater Aquarium Products and Brands
Featured Saltwater Aquarium Kits and Equipment
Hello Reef 15-Gallon Kit
Rating: 9.1/10
Design 9 | Functionality 9 | Value 9 | Beginner-Friendliness 10
Everything-in-one-box convenience—tank, AI Blade light, return pump, heater, even beneficial bacteria. Perfect for office desks or dorm rooms. The companion Hello Reef Connect portal has 50 videos guiding you through stocking—think Netflix for nano reefs. We set theirs up in under an hour; cycle finished in 8 days with Fritz TurboStart.
👉 CHECK PRICE on:
Innovative Marine NUVO Fusion 30L
Rating: 8.8/10
Design 9 | Functionality 8 | Value 8 | Upgrade Path 9
Sleek rimless with built-in overflow, dual media baskets, and laser-etched floating bottom panel. We added a mini-fuge light in the rear chamber—chaeto grew like it’s on spinach.
👉 CHECK PRICE on:
Best-Selling Saltwater Aquarium Supplies
- Instant Ocean Reef Crystals—mixes clear, hits 8.5 dKH out of bag.
- Fritz TurboStart Bacteria—cycle tanks in days, keep refrigerated.
- Chemipure Blue—all-in-one carbon + ion-exchange, polishes water.
- Refractometer by Vee Gee—lab-grade optics, calibrate with 0 ppt solution.
- Eheim Jager Heaters—shatter-proof, precise to ±0.5 °F.
👉 Shop Saltwater Supplies on:
- Amazon | Chewy | Petco | Bulk Reef Supply
What’s New in Saltwater Aquarium Technology?
- Neptune Apex EL now ships with Trident-NP to auto-dose based on nitrate/phosphate readings—your own robotic lab tech.
- Red Sea ReefLED 160S adds moon-phase lunar cycle, boosting coral spawning events.
- EcoTech VorTech MP40 QuietDrive has “Nutrient Transport Mode” random blasts detritus into suspension for export.
- Kessil A360X Tuna Blue with Wi-Fi dongle—no more blue-tooth dropouts during water changes.
📚 Recommended Resources and Communities for Saltwater Enthusiasts
- Reef2Reef Forums – 680 k members swapping frags and advice.
- MASNA – non-profit pushing marine aquarium education, student scholarships.
- BRStv YouTube – 1 000+ test videos, 52-week radio podcast.
- Aquarium Music™ Fish Care and Species Profiles – our own growing library of care sheets.
- Local reef clubs – nothing beats borrowing a PAR meter or trading coral frags over coffee.
❓ Frequently Asked Questions About Saltwater Aquariums
Q: How much does a saltwater tank cost monthly?
A: Expect 10–20 % of setup cost per year for consumables (salt, media, bulbs). A 40-gallon runs roughly a nice dinner-out per month—cheaper than therapy, more expensive than Netflix.
Q: Can I use tap water?
A: Only if you enjoy algae art installations. An RODI unit strips chlorine, copper, and silicates. We like the LiquaGen 5-stage—0 TDS or bust.
Q: How long before I can add fish?
A: Cycle first—typically 2–6 weeks. Use ammonia drops and test kits; when ammonia & nitrite read 0 ppm and nitrate appears, you’re golden. Patience, young padawan.
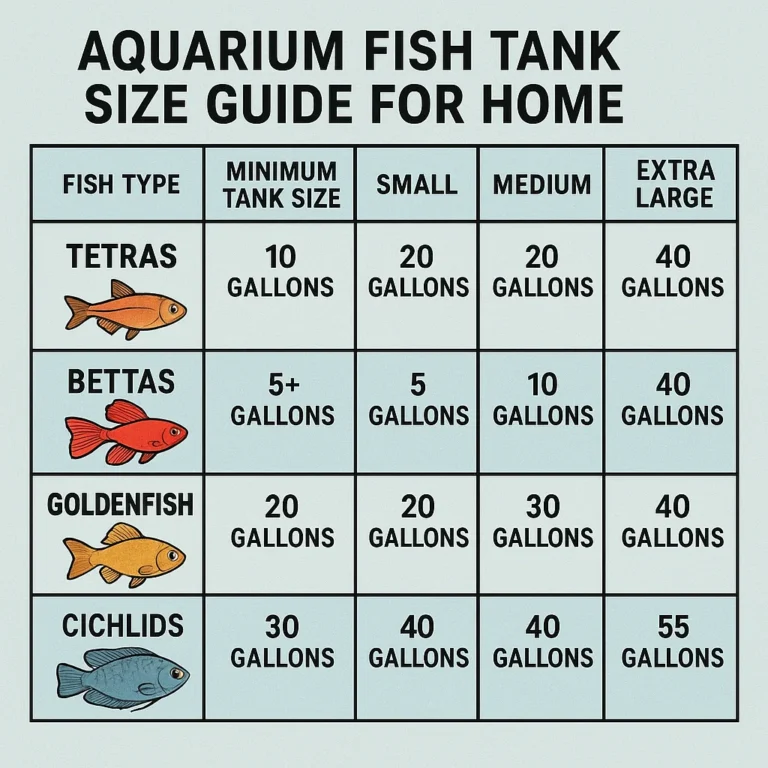
Q: What’s the minimum tank size?
A: Bigger is easier. A 20-gallon is the sweet spot for beginners—small footprint but stable parameters. Pico tanks (≤5 gal) are coral jewelry boxes; gorgeous yet unforgiving.
Q: Do I need a protein skimmer?
A: For fish-only, optional. For mixed reef, think of it as a toilet for your tank—you wouldn’t live without one, right?
Q: Why are my corals closed?
A: Check alkalinity swings, stray voltage, or rogue hermit crab using the polyp as a couch. Stability trumps mega-dosing every time.
Q: Where can I learn more about setup basics?
A: Jump to our Aquarium Setup section for step-by-step guides.
🔗 Reference Links and Further Reading
- SaltwaterAquarium.com Reward Program – earn points on every box of salt.
- Bulk Reef Supply Water Parameter Chart – reef-keeping cheat sheet.
- MyFirstFishTank.com Top Tips – hands-on learning emphasis.
- TFH Magazine Beginner Tips – classic print wisdom.
- Featured Video: Setting Up a 15-Gallon Saltwater Aquarium – watch the Hello Reef kit build in real time.
🏁 Conclusion: Your Journey to a Stunning Saltwater Aquarium

Well, there you have it—our symphonic deep dive into the world of saltwater aquariums. From the quick tips that keep your water sparkling to the intricacies of coral care, we’ve covered the essentials and beyond. Whether you’re eyeing an all-in-one Hello Reef 15-Gallon Kit or planning a custom-built reef with a Nuvo Fusion 30L, remember: patience and consistency are your best friends.
Product Highlights Recap
-
Hello Reef 15-Gallon Kit
✅ Beginner-friendly, compact, and comes with excellent instructional support.
✅ Rapid cycling with included beneficial bacteria.
❌ Limited sump space for advanced filtration upgrades.
Our Take: Perfect for newcomers craving a hassle-free start and quick success. -
Innovative Marine NUVO Fusion 30L
✅ Sleek design, flexible media baskets, and room for refugium additions.
✅ Great for hobbyists ready to level up.
❌ Slightly steeper learning curve and price point.
Our Take: Ideal for aquarists who want a stylish tank with room to grow.
Closing the Loop on Earlier Questions
Remember when we teased the importance of a PAR meter? It’s not just for show—measuring light intensity ensures your corals thrive without turning into crispy critters. And that 20 % weekly water change? It’s the unsung hero, quietly keeping your ecosystem balanced and your fish happy.
If you’ve ever wondered about the best fish for beginners, our list of peaceful, reef-safe species should be your go-to. And if you’re worried about the complexity of water chemistry, take heart: mastering salinity, pH, alkalinity, and calcium is a marathon, not a sprint. Use smart dosing, test regularly, and you’ll be rewarded with a flourishing reef.
At Aquarium Music™, we believe every tank is a living symphony—each fish, coral, and bubble playing its part. With the right tools, knowledge, and a dash of passion, you’re ready to compose your masterpiece.
📦 Recommended Links
👉 Shop Featured Saltwater Aquarium Kits and Equipment:
- Hello Reef 15-Gallon Kit:
Amazon | Bulk Reef Supply | Hello Reef Official Website - Innovative Marine NUVO Fusion 30L:
Amazon | Marine Depot | Innovative Marine Official Website
Top Saltwater Aquarium Supplies:
- Instant Ocean Reef Crystals Salt Mix
- Fritz TurboStart Bacteria
- Chemipure Blue
- Vee Gee Refractometer
- Eheim Jager Heaters
Recommended Books for Saltwater Aquarium Enthusiasts:
- The Reef Aquarium by Julian Sprung & J. Charles Delbeek — Amazon Link
- Marine Fishes: 500+ Essential-to-Know Aquarium Species by Scott W. Michael — Amazon Link
- The Simple Guide to Marine Aquariums by Jeffrey Kurtz — Amazon Link
❓ Frequently Asked Questions About Saltwater Aquariums
What are some low-maintenance saltwater aquarium options for busy owners?
If time is tight, consider a fish-only with live rock (FOWLR) setup or a small nano reef with hardy soft corals like zoanthids and mushrooms. Kits like the Hello Reef 15-Gallon provide automated dosing and easy maintenance. Use automatic top-off systems (ATO) and timers for lighting to reduce daily tasks. Avoid SPS corals and delicate species that require precise water chemistry.
How can I maintain optimal water quality in my saltwater aquarium?
Regular 20 % weekly water changes are the cornerstone of water quality. Use RODI water mixed with premium salt blends like Instant Ocean Reef Crystals. Test parameters twice weekly—salinity, pH, nitrate, phosphate, calcium, and alkalinity. Employ protein skimmers and chemical media (GFO, activated carbon) to remove organics and phosphates. Maintain stable temperature with dual heaters and controllers.
What are the most common mistakes to avoid when setting up a saltwater aquarium?
- Rushing the cycle: Adding fish before the nitrogen cycle completes leads to ammonia spikes and fish deaths.
- Ignoring water parameters: Skipping regular testing invites algae and coral stress.
- Overstocking: Too many fish overwhelm filtration and cause aggression.
- Poor equipment choices: Cheap pumps and lights can fail or harm livestock.
- Neglecting quarantine: Introducing diseases that wipe out your tank.
How do I cycle a new saltwater aquarium to establish a healthy environment?
Start by adding ammonium chloride to feed nitrifying bacteria or use live rock to seed bacteria. Monitor ammonia and nitrite levels daily; they will spike then drop to zero as nitrates rise. This process takes 2–6 weeks. Use bacterial starters like Fritz TurboStart to speed cycling. Perform a large water change before adding fish.
What is the ideal water temperature for a saltwater aquarium?
Maintain between 76–82 °F (24–28 °C). Stability is more important than hitting a perfect number. Use two heaters with a controller like the Inkbird ITC-308 for redundancy and precision. Sudden temperature swings stress fish and corals, increasing disease risk.
What are the best fish for a beginner saltwater aquarium?
- Ocellaris Clownfish: Hardy, colorful, and peaceful.
- Royal Gramma: Vibrant and shy, adds splash of purple.
- Firefish Goby: Peaceful jumper, needs a secure lid.
- Tailspot Blenny: Great algae eater.
- Green Chromis: Schooling fish, buy in groups of 5+ for harmony.
What are the essential equipment needed for a saltwater aquarium?
- Tank with overflow or sump for filtration flexibility.
- Protein skimmer to remove dissolved organics.
- RODI water filtration system for pure water.
- Reliable heater(s) and temperature controller.
- Adequate lighting (LED or T5) matched to coral needs.
- Return pump and wavemakers for water circulation.
- Test kits for ammonia, nitrite, nitrate, pH, alkalinity, calcium.
- Auto top-off system to maintain salinity.
How do you maintain water quality in a saltwater aquarium?
Maintain stable parameters through regular water changes, skimmer maintenance, and chemical filtration. Avoid overfeeding and overcrowding. Use refugiums with macroalgae to absorb excess nutrients. Monitor parameters frequently and adjust dosing of calcium, alkalinity, and magnesium to support coral growth.
How often should you clean a saltwater aquarium?
Weekly: Clean glass, empty skimmer cup, siphon detritus, top off water.
Monthly: Clean pumps and powerheads, replace chemical media, vacuum substrate surface.
Quarterly: Deep clean sump and check plumbing for leaks or blockages.
What are common challenges in keeping a saltwater aquarium?
- Algae outbreaks due to nutrient spikes.
- Coral bleaching from light or temperature stress.
- Fish diseases like ich and velvet.
- Equipment failures causing temperature or filtration loss.
- Maintaining stable water chemistry amid dosing and evaporation.
How do you create a natural habitat in a saltwater aquarium?
Use live rock to mimic reef structure and provide biological filtration. Arrange rocks to create caves and swim-throughs. Add a mix of soft and hard corals placed according to their light and flow needs. Include clean-up crew invertebrates like snails and hermit crabs. Use natural sand substrate and maintain stable water parameters.
What are the benefits of having a saltwater aquarium at home?
- Stress relief and mental wellness through observing vibrant aquatic life.
- Educational opportunities for biology and chemistry.
- Aesthetic enhancement with a living, dynamic art piece.
- Community connection through reef clubs and online forums.
- Sense of accomplishment from nurturing a complex ecosystem.
🔗 Reference Links and Further Reading
- SaltwaterAquarium.com Rewards Program
- Bulk Reef Supply Water Parameter Chart
- MyFirstFishTank.com Top Tips for Saltwater Aquariums
- TFH Magazine: Tips and Tricks for Beginner Saltwater Aquarium
- Hello Reef Official Website
- Innovative Marine Official Website
- Bulk Reef Supply
- Marine Depot
- Aquarium Music™ Fish Care and Species Profiles
- Aquarium Music™ Aquarium Setup
- Aquarium Music™ Tank Maintenance
- Aquarium Music™ Aquascaping and Aquatic Plants